This is the third episode demonstrating how we built Astrid’s amor from How to Train Your Dragon: The Hidden World. In our last episode, we cut and assembled the armor out of L200 foam. In this episode, we’re adding all the details, including the dragon scales and skulls.
Products & MaterialsCOSBOND PRODUCTS USED: Attach & Build |
Adding the details to Astrid’s armor presented some interesting challenges for us. First, the armor is intended to mimic Astrid’s dragon, Stormfly and it’s supposed to be covered with the scales that Stormfly has shed (according to the movie, the scales were attached using Toothless‘ sticky saliva — yuck!). Since we didn’t have that particular adhesive at our fingertips, and since cutting out a million scales didn’t seem like a whole bunch of fun, we figured out a more creative way to add scales — you’ll see that below.
The other thing about the armor was that all of the pieces had a million “leather” straps and edges of all different widths. This is one place where CosBond really helped us bring the piece together quickly and easily. As with any cosplay, we took some creative liberties — some because of time (we were getting ready for C2E2 in Chicago) and others because we felt they could be omitted without ruining the overall look we were going for. For example, Astrid’s actual armor also features two wing structures that help her fly when necessary, but since they’re usually folded and invisible (and since we weren’t planning on flying), we decided to omit those. Also, her armor extends through the legs and boots; we decided a pair of brown boots would do.
As with all of these tutorials, we’d love to hear how you might’ve done things differently or if you’ve used any other techniques that helped you add details to your armor. So let’s get going.
STEP 1: Adding The Scales, Edges, Straps, and Base Details
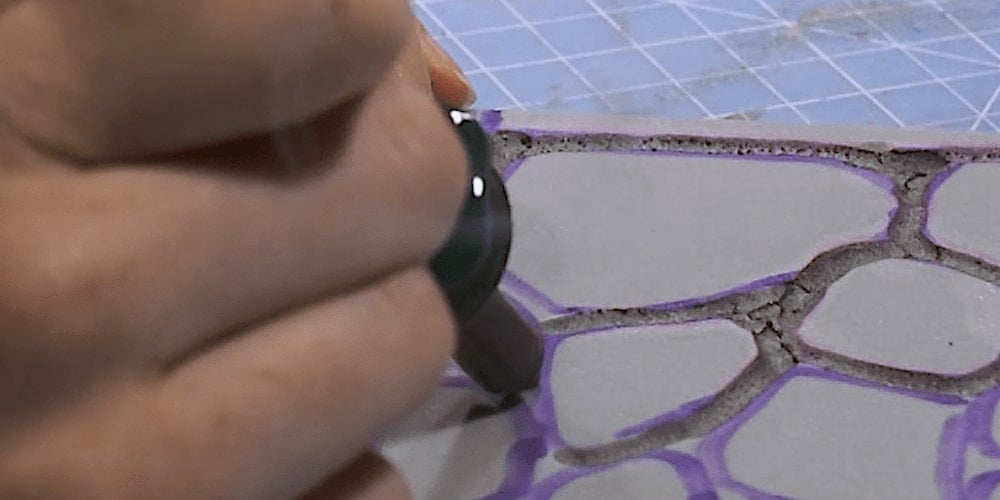
- Since CosBond makes adhering things so easy, our original concept for the scales was that we’d cut them all out and adhere them to the armor. When we took a closer look at different photos of the armor, we noticed that we could actually take a different approach (and not subject ourselves to cutting out a million scales). So we first drew all of the details on our foam armor base using a permanent marker according a few photos we downloaded from the internet as our guide. We started by adding marks where straps or edges would be located; these marks would serve as a “frame” for where the scales would be located. For the design of the scales themselves, we actually drew them on a few pieces of scrap foam first to get a good idea of how big we wanted them to be, how we wanted to lay them out, and how they fit together (haphazard/random but not too crazy), and how much room we wanted to leave in between the scales. Once we got to a design we liked, we used it as a reference to draw the scales on the actual armor pieces.
- Once we had everything drawn, we used a soldering iron to remove the foam material in between the scales, making the actual scales stand out. When doing this, be sure to have a light hand and remove the material very carefully so you don’t go all the way through the foam. Remember that you can always go back over a particular spot to remove a little more material to make the scales stand out a little more, but you CAN’T add the material back if you take too much off. This whole process — drawing and soldering — was a pretty time-consuming but the results were fantastic. Our foam armor was really starting to look just like Astrid’s. PLEASE NOTE: when using the soldering iron with the foam, please be sure to do so in a well-ventilated area and make sure to wear a mask as the fumes can be toxic.
- Adding the “leather” straps and edges to the armor was super easy with CosBond Attach & Build. Since the various edges and straps had different widths, we adhered the CosBond to the larger pieces of the L200 foam or the craft foam and then cut the strips to the dimensions we needed (check out the episode on adding the details to Astrid’s axe to see why we decided to use foam to create the “leather” straps). By having the adhesive already applied to the foam, all we had to do was simply cut each strip to the length we needed and then peel the release paper to stick it to armor.
 |
|
Check out our blog post on how to carve foam with a soldering iron for more tips and techniques to help you in this process. {{cta(‘538bc940-003c-46c8-b5bd-4423cb1b4c1e’)}} |
In many cases, we actually cut the length AFTER adhering it to the armor. Even with the CosBond making things super easy, adding these details was still quite a time consuming process (we can’t imagine how long this would have taken if we were using contact cement or some other adhesive). But we simply plugged along until we had the look we wanted and continued to the other details.
Step 2: The 3D Details
After getting the scales and the base details completed, there were a number of three-dimensional details that still needed to be added — these included the spikes on the legs and forearms, the triangles on the lower legs, and the dragon skulls on the belt skirt. Each of these details was a relatively easy to pull off with little bit of time and some creativity. So here’s how the design came together.
- To make all the foam spikes on the armor, we simply patterned the pieces and cut them out of the L200 foam. We sanded down the edges to give each spike a more “organic” look. We then used CosBond Attach & Build to attach each piece to the armor base. We then used googly eyes to create the screw/nail heads — very much like we did on Astrid’s axe.
- For the 3D triangle details on the lower leg of the armor, we first patterned each triangle in the appropriate size by drawing each “side” of the triangle. We then transferred the pattern to our L200 foam and cut each piece out with our box cutters, making sure to angle the cut on the side where the two pieces would come together. When we CosBonded the two pieces together at the angle-cut edge, we were able to achieve the 3D look we wanted for each triangle. When then used CosBond Attach & Build to attach each triangle to the armor. Since this detail was way down by our feet, we left the hole at the bottom of each triangle open as it wouldn’t be visible anyway.
- The last details we needed to add were the dragon skulls on Astrid’s belt skirt. For these, we referenced a print out of the skulls and sculpted them using Apoxie Sculpt. As we mentioned in our episode on the details of Astrid’s Axe, Apoxie Sculpt gives you the benefits of sculpting clay but also adheres to just about any surface like an epoxy. After adding all of the details and smoothing out the surfaces with a little water, we traced and cut the shape of the skull onto our CosBond Attach & Build so we could stick each skull to the belt skirt. We then let the skulls dry and harden (Apoxie Sculpt self-hardens — no baking — in about 24 hours) so they could be ready to paint along with the rest of the armor.)