Today in the CosBond workshop, we’re sharing our first episode of our Kat from Gravity Rush II cosplay tutorials. In this episode, we’re going to show you how we got started with the cosplay by patterning Kat’s armor, assembling those armor pieces, and altering the jumpsuit that would make the base for Kat’s outfit.
Products & MaterialsCOSBOND PRODUCTS USED: Attach & Build |
In preparation for Phoenix Fan Fusion, our second convention of 2019, we knew we wanted to make an entirely new cosplay (even though we were still so proud of our Astrid build). While that armor was super impressive, we wanted to go bigger with our next cosplay in a different way, and we had one idea in mind: lights. After some brainstorming on characters we could make that would require LED elements, we settled on one we thought would be really cool — Kat’s Lunar form from the video game Gravity Rush II. Kat is one of the protagonists of the gravity-defying game, and we thought the details in her glowing outfit would be really fun to create, so we got to work researching, designing, and planning out Gravity Rush cosplay so that we could get it done in time for PFF.
After gathering all the supplies we were going to need, we jumped into three main tasks: patterning our armor pieces and the details we’ll alter on top, assembling the main base of our armor, and hemming the black jumpsuit we bought to use as a base for Kat’s main outfit. There are multiple ways we could have approached this cosplay, and something different might work better for you, but here’s how we started our Kat cosplay.
STEP 1: Patterning
Like most other cosplays, the armor had to start with a pattern so that we could get it to fit perfectly. To start, we decided to use the plastic wrap and duct tape casting method to get a perfect fit pattern for our arm and leg armor. This method is pretty common, and it’s similar to what we did for Astrid’s armor, but we wanted to take the time to go through these steps so that you can see the whole process.
- Before we started creating the arm and leg casts, we made sure to put on any items of clothing that we’d be wearing underneath the armor. That way, we could be sure that the patterns left enough room to fit over them. For Kat, we put on our long black gloves.
- To start the casts, we wrapped the parts that we wanted to cover in armor with clear plastic wrap — so our forearms and shins. If you can’t reach or have trouble wrapping yourself, get a friend to help you. We made sure not to wrap the plastic too tight because that would make our armor too small.
- Then we went over our plastic wrap with a layer of white duct tape. We also made sure not to make this too tight. We prefer white duct tape because it’s easier to see marker lines on.
- Once the duct tape was on, we took a marker and started to sketch a rough outline of the base of our armor. Once the outer shape of the armor was on, we made sure to add lines for the seams where we wanted them. You can always get a friend to help you if you can’t reach to draw your lines.
- Once everything was sketched, we took scissors and cute along the seam lines of our duct tape and removed the casts. Then we cut out the outer shapes of the base patterns that we drew. We traced around those pieces on stiff construction paper and cut them out again to make our actual pattern pieces.
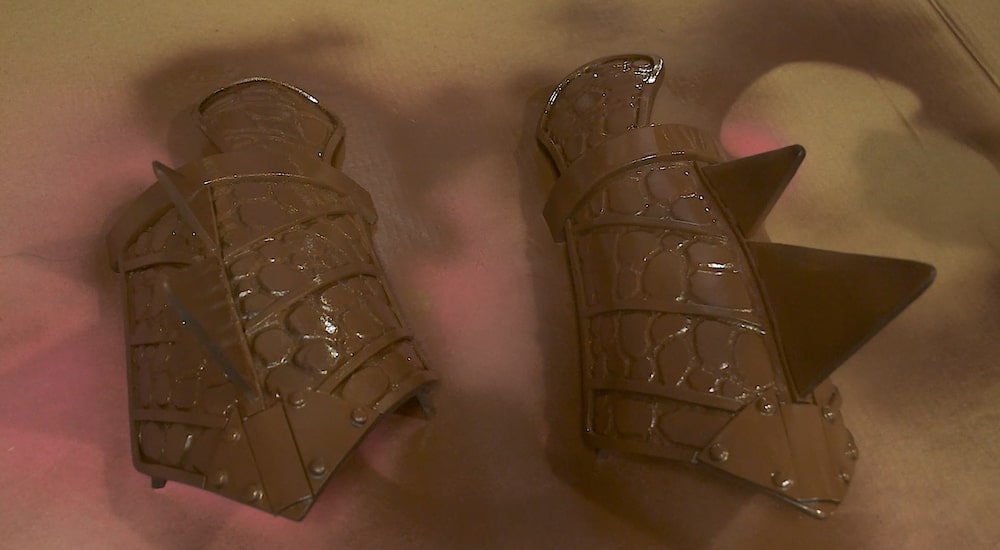
- We took our construction paper patterns and traced around them on the foam. We were especially careful with the curved pieces. Because our armor is supposed to curve away from the body, we added curved lines to our pattern. When we put together the curves in foam later, they would curl to their points because of the way foam behaves.
- When we were satisfied with our base shapes, we got ready to add on details. In order to make a plan for those, we lightly traced the base pieces we made onto more construction paper. Then we sketched the details we wanted to make on top of these shapes so we knew how they would fit. It’s always a good idea to draw these details a little bigger than you think you need because you can always cut them down later.
- Once we have those detail shapes, we traced them onto the foam. Once everything was traced, we started to cut everything out of the foam. We like to use a box cutter for this because the blades are easily replaced when they begin to dull.
Step 2: Armor Assembly
With all of our armor pieces now cut out of our foam and ready, it was time to move on to the assembly stage. We cleared some space and got out our adhesive of choice at this stage: contact cement. Contact cement is a super-strong industrial adhesive that works great with foam and bonds permanently. However, contact cement is also incredibly toxic, and you don’t want to be breathing in those dangerous fumes while you’re working. As a reminder, contact cement should only be used if you’re wearing a mask or in a well-ventilated area for your safety. So, with our contact cement ready, we started assembling our armor.
- With our armor pieces lined up, we started to join them at the seams with contact cement. We painted both edges with the contact cement and a flat paintbrush. We waited 15 minutes for both pieces to get tacky. Then we guided the pieces together, which is easiest using your thumb. We repeated this with all of our base pieces that needed joined together.
- With the bases together, we started gluing the detail foam pieces on top using contact cement as well. We painted more contact cement onto the base pieces because it’s better for areas of constant stress, and the curved foam pieces would want to pull away. Contact cement would be strong enough to hold them together.
- We gave everything a few hours to dry while we started in on our jumpsuit. Step 3: Hemming the Jumpsuit
In order to cut down a little on both time and sewing for this cosplay, we decided to use some regular clothing as a base for Kat’s outfit. This is an easy way to get around the bulk of sewing if that’s not one of your strongest suits. We found a long, black jumpsuit for a reasonable price on Amazon that we decided to use for Kat’s outfit. We just needed to shorten the legs into a romper style to match Kat’s outfit from the game. Thankfully, we were able to use Attach & Build adhesive to make new hems in the legs to avoid even more sewing. Here’s how we altered our jumpsuit into a style that looked more like Kat’s clothes.
- Elyse tried on the jumpsuit and looked in the mirror to figure out what length we wanted to cut the legs down to. Once we decided how short to make the legs, we cut them off with a pair of scissors.
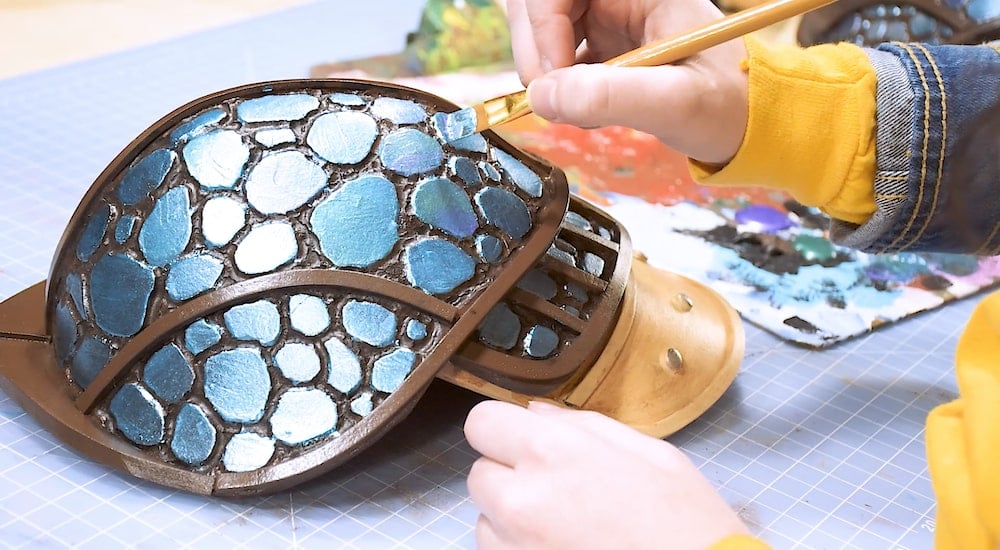
- Once all of the scales were painted teal but not quite dry, we poured out some of our purple (6313 – Tanzanite) and green (6310 – Malachite) metallics to add some more dimension. We used our paintbrush to add pops of green and purple across the tops of the scales, mixing them in with the blue to create a custom, shifting color that matched Stormfly’s scales from the movie. We switched between adding one accent color at a time and dipping our brush in both colors side-by-side for a gradient look.
- To make ti quicker and easier than sewing, we used Attach & Build to fasten the hem. First, we cut thin strips of Attach & Build. Then we peeled one side of the release paper and stuck it under the hem. We peeled off the other releases paper and stuck the fabric down to create the new hem.
- Finally, we went over the new hem with an iron. This got the adhesive to sink into the fabric and makes the hem really crisp and straight.