Most cosplayers need a wide variety of tools in their arsenal in order to make the cosplays they want to make. While you can certainly get by with just the essentials or even improvise in many situations, there are other times when you just need a specific tool to get the build done. But that doesn’t mean you have to buy a need tool for every cosplay. Lots of common cosplay tools have multiple uses to get the most bang for your buck, and today, we’re focusing on some of the many different techniques you can accomplish with a standard heat gun. In this post, we’ll give you our best heat gun tips and tricks, as well as go through a few safety reminders to think about when you’re working with heat and foam.
Heat Gun Foamsmithing Tips and Techniques
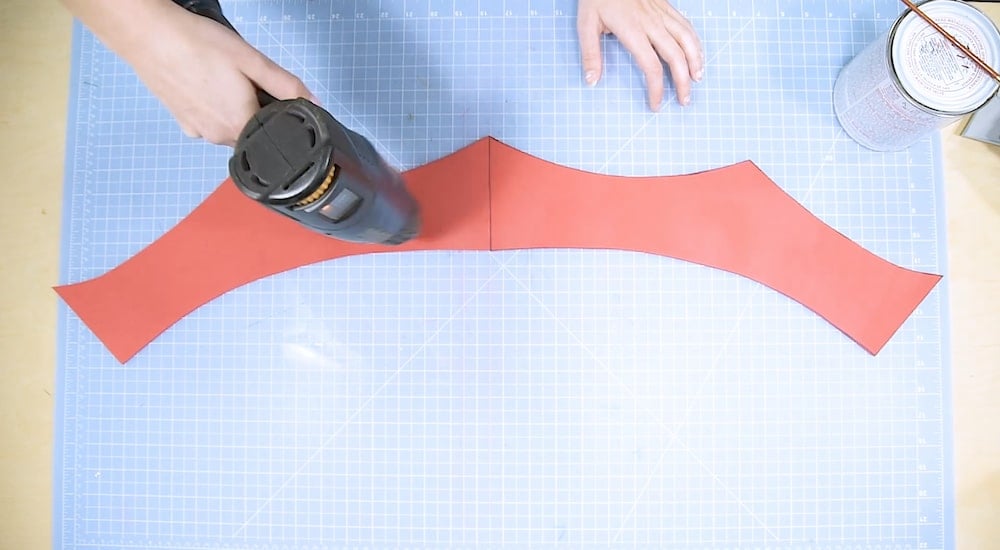
- Of course, you probably already know that a heat gun can be used to heat and soften your EVA, L200, and craft foam so that you can bend, mold, and curve it into the shape you need. However, if you’re having trouble getting an even curve or shape, here’s a trick for you: find a metal object that has the same shape you’re going for and use it as a model. You can hold the foam around the metal item and apply heat, and the foam will take the shape of the object. Just be sure the object is metal so that it won’t burn or melt.
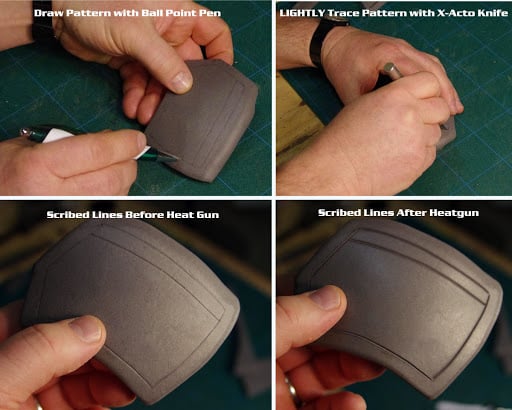 If you carve lines or shapes into your foam using a craft knife or box cutter, you can open up those lines by applying heat with your heat gun. This can make lines bolder and more noticeable, allowing you to carve into your foam for detailing instead of adding material to create more dimension.
- Your heat gun can help smooth out rough edges in your foam. If you’ve been grinding away at a curved edge, for example, or you want a blunter point on the edge of your foam sword, hitting the foam with your heat gun will help smooth down any harsh edges, giving your foam a rounder appearance.
- Applying heat to foam also closes the pores in the material. This is usually called heat sealing your foam. By going over your foam piece with your heat gun, even just in a few quick motions, your foam won’t soak up as much paint when you go to add your colors and finishes. You should still seal with Plasti Dip or another coating, but you’ll get a more vivid paint job when you heat seal first.
- Finally, if you really want to make sure that the foam piece holds the shape you’ve heat formed it into, wrap and tie it with a piece of string in the exact position you want it to stay. If you let the piece cool down for a few hours or even overnight before removing your string, it’s more likely to hold its shape.
Heat Gun Safety Tips
 Staying safe while using your heat gun is a pretty simple task, but it never hurts to have a quick refresher on safety procedures when working with heat. First of all, you need to think about protecting your fingers when you’re heat forming. Both the hot air from the heat gun and the foam itself will be very hot, so you should take precaution when handling both. Many cosplayers choose to wear heat protective gloves while working with a heat gun. However, others may find it difficult to work in bulky gloves, so you have a few options.
We’d recommend smoothing your edges or shapes with a tool if you can. Clay sculpting tools or metal cutlery often work well for this. If you choose to use your bare fingers, make sure not to touch hot foam for more than a second or two, and don’t shoot heat directly onto your hands.
Additionally, you should wear a respirator mask when heating foam, which can give off toxic fumes that you don’t want to be breathing in. Lastly, don’t make the mistake of thinking your hairdryer can replace a heavy duty heat gun. Maybe it will work in a pinch, but it’s safer to use hairdryers only for their intended use — drying hair. If you’re working with foam on a regular basis, investing in a heat gun can really make a difference in your cosplay process.