This is the fourth episode demonstrating how we built Astrid’s amor from How to Train Your Dragon: The Hidden World. In the last episode, we showed you how we added all of our armor details, including the dragon scales, skulls, and straps. In this episode, we’re going to show how we put the final paint job on our foam armor pieces using a variety of paints and techniques.
Products & MaterialsCOSBOND PRODUCTS USED: N/A |
For many, painting is a really fun step in the cosplay process. Because you’ve likely been building with an assortment of randomly colored foam pieces, you can see how your armor is taking form, but it doesn’t really look like it belongs to your character just yet. Most times, it’s the finished coats of paint that really bring your armor to life. That’s certainly what we felt with Astrid’s armor.
The biggest decision we had to make during this stage was which type of paint to use. On one hand, spray paint is great for covering armor pieces quickly and evenly, but it doesn’t lend itself to small details. On the other hand, acrylics offer the wide range of colors we needed, but with the convention creeping up closer and closer, we were in a bit of a time crunch and didn’t have much wiggle room available to paint the entire armor set by hand. In the end, as you’ll see farther down in the tutorial, we decided to go with a combination of the two for the perfect professional finish.
 |
|
Read all about the differences between painting with spray paint vs. acrylics on your cosplay well as how using both types of paint together can sometimes give you the most impressive results. {{cta(‘345717f0-3034-4dac-9741-5967f5d4c431’)}} |
As with all of these tutorials, we’d love to hear your thoughts on how you might’ve done things differently or if you’ve used any other techniques that helped you paint your armor. Let us know what you did by commenting below or posting on our social media pages. Without further ado, here’s how we painted Astrid’s armor.
STEP 1: Sealing the Foam
The first step of any foam painting process is sealing your foam. If you were to paint directly onto unsealed foam, your paint wouldn’t last very long. Because foam is still somewhat flexible, your paint would chip and crack at every place where your foam bends or moves. By sealing your foam with something flexible before you start painting, you give the paint on top some leeway that helps it move without cracking. When it comes to sealing, you have a few options. Some cosplayers like to cover their foam with wood glue, PVA (white) glue, Mod Podge, resin, and even latex. For Astrid, however, we used Plasti-Dip, which is a rubberized spray coating usually used in the automotive industry. Plasti-Dip is a great sealing option because it’s quick, easy to apply, and one of the most flexible options on the list. We used a neutral black color because we knew we’d be painting darker colors over it anyway. So, here’s how we did it:
- First, we arranged our pieces of armor on cardboard to protect our floor from overspray. If you have a spray booth, you could use that, but we found it just as easy to paint on the floor. The plan was to cover the entire surface of the armor, including all the details, so we didn’t need to tape anything off or cover anything up on our armor. This is why the colors of our foam hadn’t mattered up until this point. As a reminder, you should only use spray paints in well-ventilated areas or with a respirator mask. Holding the spray can 10-12 inches away from the foam, we sprayed in even, sweeping motions until our first piece was completely covered. We repeated this process 4-5 times to ensure that our foam was coated in several layers of Plasti-Dip.
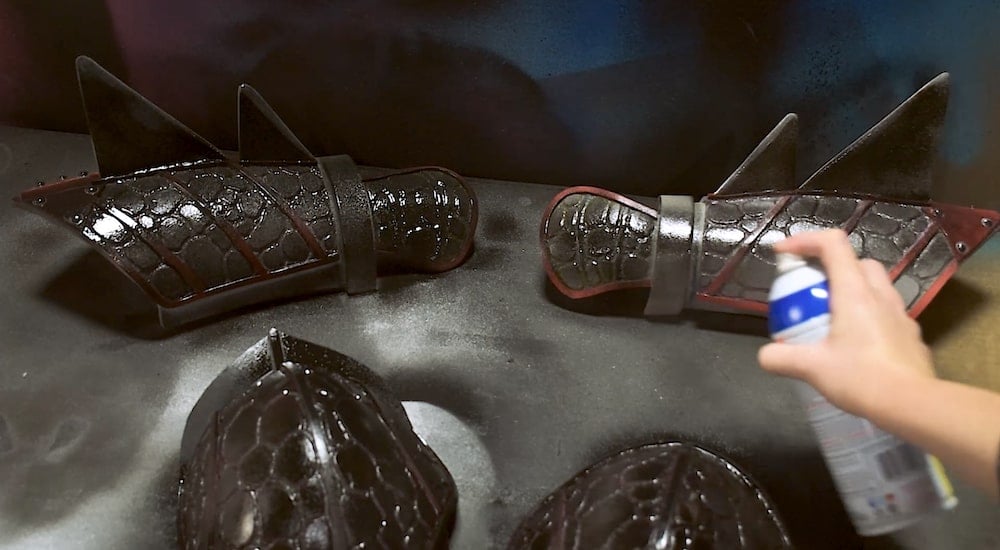
- Then we repeated this process on all of our armor pieces. We started with our shoulder pieces, then moved on to our wrist guards, and then… everything else. The order doesn’t matter. We let the Plasti-Dip dry (which took roughly 30 minutes) before moving on to our actual painting steps.
Step 2: Spraying the Base Layer
Because we had so much armor to paint, we wanted to be as efficient as possible during the painting process. Our ultimate goal was to make good use of time while still achieving a professional, realistic finish that really looked like leather and scales. We decided that the best way to do this was to use two different kinds of paint in tandem: spray paint and acrylics. With our game plan in mind, we started by laying down a base coat of spray paint first. We used Rust-Oleum Painter’s Touch 2X Ultra Cover Paint & Primer Spray Paint because it adheres well to plastic, so we knew it would give us excellent coverage over the Plasti-Dip and the little googley eyes that would become the nail/screw heads. Here’s how we did it:
- Because the majority of Astrid’s armor is made of leather, we decided to use brown as our base spray paint color. This way, all of the brown leather parts would show through the more finely-painted details. Just like with the Plasti-Dip, the prep was minimal because we would be spraying the entire surface of each piece, details included. We set our pieces on our cardboard and got ready to spray.
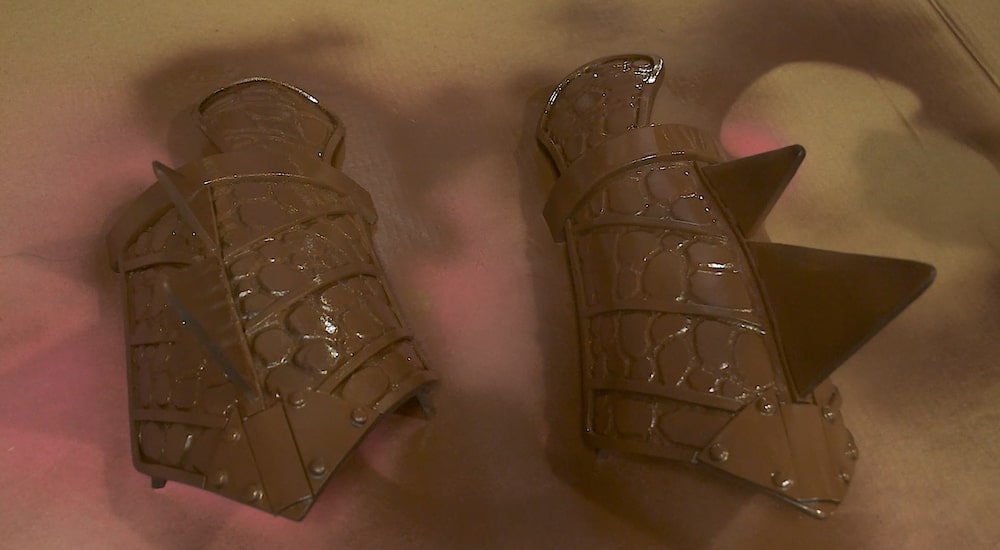
- Using the same spraying method we did with our Plasti-Dip, we covered our armor pieces with several coats of our brown spray paint using even, sweeping motions from 10-12 inches above the foam. Once the color was layered and opaque, we let our pieces dry completely before going in for a little more detail before adding more color. Even though you’re SO close to being done with the piece, you really have to resist the urge to spray heavily to get it done quicker as the results will simply not be as good. For us, it took four coats to get the coverage we wanted. Also, remember to spray in a well-ventilated room so the fumes don’t build up.
- We’ve talked about weathering in past tutorials—it’s the technique we use to make foam look worn and realistically dirty like metal or leather would be. Before moving on to our metallic colors, we took some black acrylic paint (Liquitex Heavy Body Acrylic Paint) and dry-brushed it into the cracks we carved between our dragon scales with our soldering iron to make the crevasses look deeper and more weathered. After brushing the paint on, we wiped off the excess with a paper towel, not leaving too much pigment behind. We just wanted enough to give our “leather” a grittier look
Step 3: Painting the Details with Acrylics
Finally, we were ready to add the color, dimension, and detail that would make our armor really match Astrid’s. With the spray paint dry and weathering done, we got out our bottles of acrylic paint and some clean brushes to tackle the final coat of paint. We used the FolkArt Multi-Surface Acrylics from Plaid because they work on almost any surface you can imagine, it has the nice satin finish we wanted, and because once it cures it won’t rub off (so we wouldn’t need to spray it with a protective coating). Here’s how we did that:
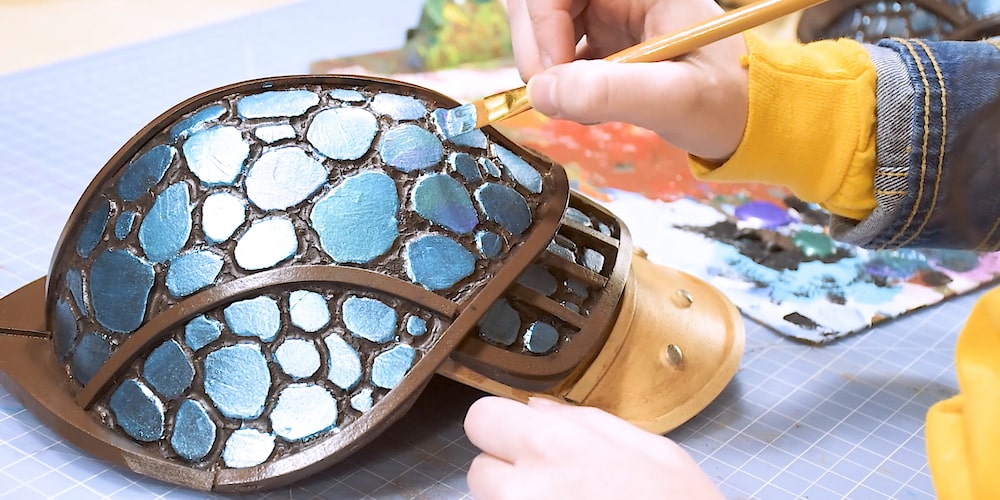
- We started with our dragon scales. First, we squirted out some of our teal metallic acrylic paint (6311 – Teal Topaz) onto a piece of cardboard we were using as our palette. You could use a real palette or a paper plate, too. Using a small brush, we started carefully painting the teal onto the tops of the dragon scales. This process is a lot more precise than spray painting, so we had to be cautious not to get paint down into the cracks between the scales where we wanted the brown to show through.
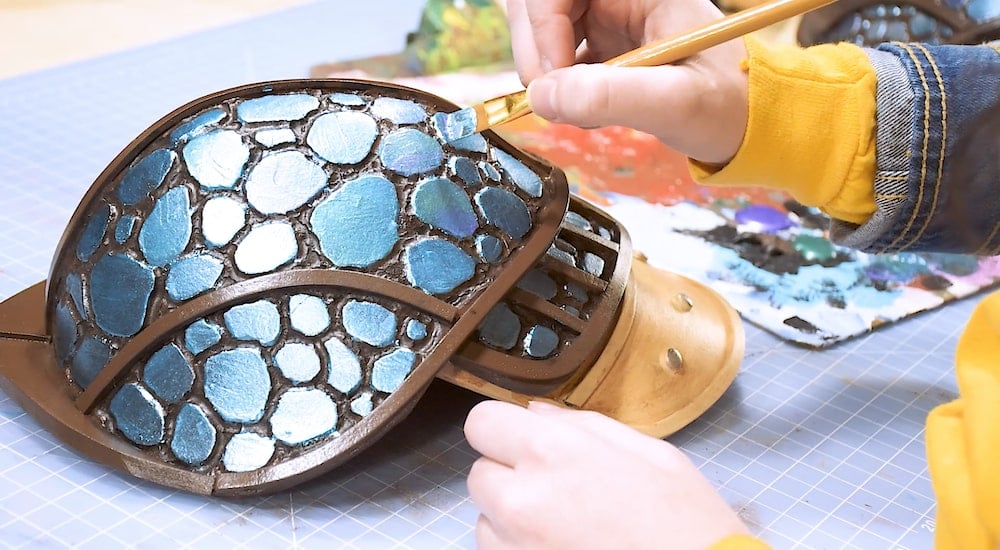
- Once all of the scales were painted teal but not quite dry, we poured out some of our purple (6313 – Tanzanite) and green (6310 – Malachite) metallics to add some more dimension. We used our paintbrush to add pops of green and purple across the tops of the scales, mixing them in with the blue to create a custom, shifting color that matched Stormfly’s scales from the movie. We switched between adding one accent color at a time and dipping our brush in both colors side-by-side for a gradient look.
- After the scales were finished, the lighter brown leather details were the only ones left to paint. We used our reference photos to custom mix the shade of tan we wanted using a few different acrylic colors. We just kept adding and mixing the paint until we were satisfied. Then we brushed it onto the appropriate details, like the spikes on Astrid’s wrist guards, being careful not to get any tan on our scales or brown “leather.” We also painted the necessary screw head details silver the same way we did on Astrid’s axe. All we did was spray out a little silver spray paint onto a piece of cardboard and brush it over the tops of the googly-eye screw heads.
- Once all of our acrylics were dry, we went back in for one last round of dry-brush weathering. Using black and brown acrylics, we dabbed some paint onto the darker leather pieces and wiped the excess away with a paper towel until we were happy with how our “leather” looked.