This is the second of four tutorials demonstrating how we built Astrid’s axe from How to Train Your Dragon: The Hidden World. In our last episode, we got the ball rolling by developing the pattern, cutting out the axe head from insulation foam, and assembling and sanding the axe head. In this episode, we’re continuing our work on the axe head by adding some details but also protecting the axe head with Worbla. Check out the video below and read on for a detailed tutorial.
Products & MaterialsCOSBOND PRODUCTS USED: CosBond Attach & Build |
Taking the time to give the axe head the basic shape we wanted and to get it nicely sanded and smooth was an important step in our previous episode, and it gave us a nice base to add the details. While there will many more “cosmetic” details that we’ll cover in future episodes, all of the details that we’re including in this episode are about continuing to add shape and dimension to the piece. Basically, they’re all underlying features that we need to add before we completely cover the axe head with Worbla. While details such as weapon damage could theoretically be added after the Worbla has been applied, thinking about them in advance will result in a better end product and much less work going forward. So let’s get going:
STEP 1: Adding Weapon Damage and Other Underlying Details
- This step is about starting to give the axe head a realistic look by adding the nicks, chips, and other wear that the axe head would endure in Astrid’s battles. We started by using our box cutter to cut in some chips on the edge of the blade. We then used our soldering iron to add gashes and pits across the surface of the blade. Simply use the tip of the soldering iron like a pencil and have some fun. How much and what type of weapon damage you add is completely up to you and your artistic point of view for the piece. You also want to think about where the axe would realistically take damage. Just remember to vary the depth, width, length, and tapering of each gash and pit that you add to achieve the desired look. IMPORTANT: please remember that when using a soldering iron on insulation foam, do this in a well-ventilated area, and wear a gas mask as the fumes from the heated foam can be toxic.
- Next, we focused on the detailing around the center of the axe ahead. For this, we went back to our original print out pattern, cut out the center section, and traced it onto construction paper. We then used our construction paper pattern to trace the shape onto our 1/4″ thick EVA foam. We needed four of these shapes so we could create the center section on each side of the axe.
- After cutting out each of the four pieces with scissors, we stuck them together using CosBond Attach & Build. We simply cut a strip of the Attach & Build and applied it to the edge of one piece of foam, then trimmed the excess with scissors. We then peeled the release paper and attached the other side of the foam to create the full center piece. You may be asking yourself, “Why not just use a larger piece of EVA foam to create this shape?” The reality is that you could easily do that, but you may not have a larger piece of EVA foam at your disposal (and larger pieces of EVA are often more expensive). We wanted to show you how CosBond Attach & Build can help you achieve the desired look even if you don’t have the ideal set of materials at your fingertips.
- Now it was time to apply our new EVA foam center section to the axe head. We used the EVA foam section as the pattern to trace the shape onto a couple of sheets of CosBond Attach & Build. We then cut out the pieces of Attach & Build to cover the entire surface of each center section, peeled off the release paper, and applied it to one side of the foam center section. Then it was simply a matter of peeling off the release paper on the other other side, lining up the foam pieces onto the axe head, and pressing them down to instantly adhere them.
 |
|
Check out our tips for travel-proofing your prop with Worbla and some examples of the different types of thermoplastics avaialble for cosplay. {{cta(‘0f7a61dc-2616-4434-8f6e-7c9b0dcaba99’)}} |
Step 2: Protecting & Shaping with Worbla
With some of the underlying details in place, we were ready to cover the axe head to protect it and provide a new surface for adding more details and for painting. There are various options for covering/protecting your props including things like rubberized Plasti-Dip and even some primers. For us, we knew this piece had to travel to some cons that we were attending, so we wanted something that was going to be really durable. We decided to use a thermoplastic because it would be relatively easy to work with in this application, and it gave us the protection we needed. We chose Worbla’s Finest Art (the original Worbla) as it’s easy to use, non-toxic, self-adhesive, and very forgiving as it could be heated multiple times to achieve the shape we wanted. Here’s how this came together.
- We started with a piece of Worbla that was large enough to cover one side of the axe head. We then used our axe head as the template to trace the shape onto the Worbla using a marker. When doing this, you want to make sure you overestimate the size to ensure it will cover the entire surface of the axe head, as you can always trim off the excess. We then used some heavy-duty shears to cut out the Worbla. You can use tin snips as well, but just make sure you use something more “heavy duty” as cutting the plastic can really dull traditional scissors. We then cut the piece of Worbla in half to make it easier to apply.
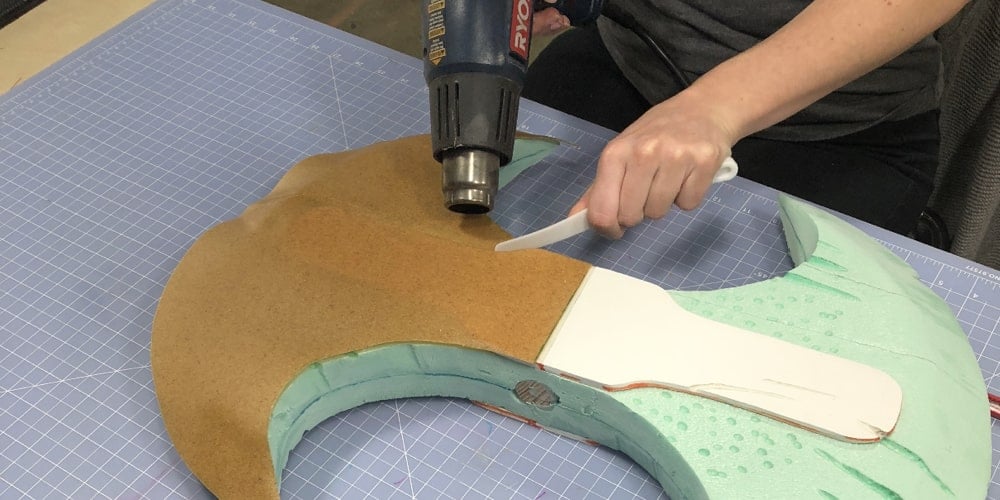
- Applying the Worbla is a relatively easy process. Simply use a heat gun heat up the Worbla. You’ll know it’s ready to apply when it loses its shine and becomes super flexible. We then covered one side of the axe and started the process of smoothing it out. Worbla has its own adhesive when heated, so it will adhere nicely to the foam underneath. Then we begin shaping and forming the Worbla so the features we added earlier would show through.
- Shaping and forming the Worbla is also an easy process, but it requires a little patience. To get the details to that we added earlier to show through, we simply heated specific sections of the applied Worbla and used different shaping tools to press and form the Worbla until it took the shape of the details underneath. This is not something that you’ll want to do with your hands as the Worbla will be pretty hot, and your fingers may not be able to create the fine details that you’re looking for. Luckily, anything in your house (kitchen utensils, art supplies, brush handles, etc.) can be a shaping tool, so don’t be afraid to be resourceful. Once we covered one side of the axe head and shaped the details with our clay tool, we did the same with the other side. At the edge of the blade where the Worbla on each side of the axe head came together, we simply trimmed off the excess, heated the Worbla on both sides and used a tool to smooth out the seam — the heated Worbla easily adhered to itself. After we covered both sides of the axe head and trimmed off the excess, it was time to cover the sides of the axe head.
- To cover the sides of the axe head, we measured the width of the axe head at its widest point and cut a strip of Worbla long enough to cover half of the side. We also took time to cut out the piece that would cover the wooden dowel that will later receive the axe handle. Then it was simply a matter of heating the Worbla, applying it to the side of the axe head continuing to heat it as necessary until it had adhered to the foam. We then trimmed off the excess, heated the edges, and used our shaping tools to ensure a nice seam with the surface of the axe head.
STEP 3: Adding the Dowel Screw for the Axe Handle
Now that the axe head is fully protected with Worbla, we wanted to add the dowel screw to the wooden dowel that we sandwiched into the center of the axe head in the previous episode. A dowel screw is simply a lag threaded stud used to fasten two pieces of wood. Like a typical stud, a dowel screw is a headless, double-ended screw but has wood screw threads at both ends.  As you might recall, we did this so we could easily attach (and remove) the axe handle at a later time to make it easy to ship to the various cons we plan on attending. Anyway, this was a good time to add the dowel screw so we don’t have to worry about it after we’ve added some of the finer details (like paint). Here’s what we did:
- When we purchased the 1-1/4″ wooden dowel that we sandwiched into the axe head, we also purchased a length of the same dowel to serve as our axe handle. Most places (like Home Depot) will cut these to your specified length so you don’t have to worry about it. So we placed our axe handle dowel in a vice so we could see the end that would attach to the axe head and marked the center. Since we’re using a 1/4″ dowel screw, we first made a pilot hole using our drill with a 1/8″ bit. We then went back and enlarged the hole with a 1/4″ bit. We “eyeballed” how deep we made the hole — but if you want to be precise you can always mark your drill bit with a marker or a rubber band at the depth that you want to achieve. We then repeated the process on the dowel that was sandwiched in the axe head. Lastly, since the dowel screw has no head, we used a pair of vise-grip pliers to screw it into the axe head until approximately 1-1/2″ was left exposed — this would be perfect length to screw in the handle (we didn’t snap a good pic of the dowel screw in the axe head while we were doing this so the pic above shows what it looks like a little further in the process).